One of the remarkable things about the modern airplane engine is its reliability. In fact, it's considered the norm for a pilot to fly an entire career in a small, piston powered airplane and never experience a catastrophic engine failure. Yet, even when an engine does fail it seldom meant "curtains" for the pilot. What was once an airplane with a perfectly good running engine now becomes a semi-efficient glider with a large useless weight in front. The fact is that properly trained pilots can successfully cope with an engine failure.
In this lesson you'll be introduced to several techniques for handling an engine failure in the Beechcraft Baron 58. Of course, the Baron is a multiengine airplane, and the failure of a single engine requires some very special training that is beyond the scope of this session. That's why this lesson will specifically cover how to handle a double engine failure. Granted, a double engine failure is rare, but it can happen, especially if you are having a bit of bad luck. (In other words, this wouldn't be the best time for you to invest in a Lotto ticket). Fuel contamination, fuel starvation, and fuel exhaustion are just a few of the reasons pilots have invented to see to it that both engines cease operating at the same time. Despite the experience of a double engine failure in a Baron, this lesson will provide you with useful principles for handling an engine failure in any of Flight Simulator's single-engine airplanes, too.
The Big Picture
Before we jump into our discussion of engine failure procedures, here's a basic description of what will happen during the flight portion of this lesson.
You'll begin the lesson in cruise configuration while flying at 170 knots approximately five miles south of Paine field in the state of Washington. Both engines will quit simultaneously. Making the "brrrrrrrrrrrrr" engine sound with your pursed lips won't bring the engines back on line. Besides, it could fog up the windshield.
Your first action will be to lower the airplane's nose to establish the proper glide speed. Then you'll run through the engine failure checklist in an attempt to restart the engines. Of course, the engines won't restart because that would defeat the purpose of the lesson. Next, you'll activate the GPS and find the nearest airport. (I've already given you a hint where it's at.) You'll fly to the center of that airport, circle down from above, and land on a runway of your choosing. (Even though both engines fail in the Baron, I'll speak of the engines in the singular, rather than the plural for this lesson. This will help make the lesson applicable to single-engine airplanes, too.)
That's the big picture. Are you ready for juicy details? OK, let the games begin, or, in instructor talk, "Let the engines stop."
When an Engine Quits: The Very First Step
 Figure 3-1 |
Very few things are as certain as the proper piloting behavior that follows a failed engine. The moment your engine goes on strike you should immediately lower the nose to the pitch attitude that will provide the maximum range glide speed. In the Baron, this speed is 115 knots (Figure 3-1). What does the maximum range glide speed give you? Here's a hint: Who's buried in Grant's tomb? It gives you the chance to glide the greatest horizontal distance for your present altitude (we'll assume this is a no wind condition for all these examples).
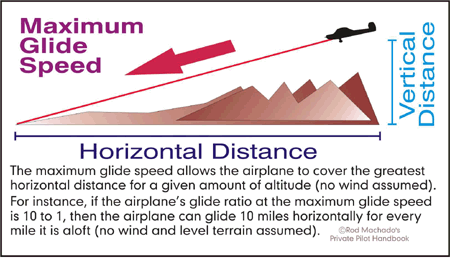 Figure 3-2 |
You might be surprised to know that most piston powered airplanes have glide ranges of approximately 10 to 1 (Figure 3-2). No, those aren't the odds that you won't make the landing field, either. This value indicates that if you're 1,000 feet above ground level you can glide 10,000 feet horizontally. This is pretty impressive considering that some purpose-built gliders have glide ratios beginning somewhere around 18 to 1. An airplane without an operating engine is a slightly inefficient glider, but it's a glider nevertheless. With a 10:1 glide ratio, you have a good chance of finding a farmer's field or an airport on which to land the airplane. Of course, it's preferable to put the airplane down at an airport instead of a field whenever possible, for several reasons. The most compelling of which is that you won't find airplane mechanics standing around farmer's fields unless they're moonlighting as scarecrows.
Once the maximum range glide attitude is established and the airplane trimmed, you now have an important choice to make. If you're close to the ground when the failure occurs, there's not much time to troubleshoot the problem. Your first priority in this instance is to find a place to land because that's what you're about to do. On the other hand, if an engine fails in cruise flight, you have a little more time and can run though the engine failure checklist before having to focus solely on the landing. How you handle an engine failure between takeoff and cruise flight is based on your assessment of the altitude available and the environment over which you're flying.
Since this lesson's engine failure occurs in cruise flight, you should have just enough time to quickly run through the engine failure checklist. Here is what you should check and the order in which you should check it.
Basic/Abbreviated Engine Failure Checklist
(Numbers correspond to the following explanations)
- Airspeed: Pitch for 115 knots
- Fuel Selectors: Each set to ON
- Fuel Pumps: ON
- Mixtures: RICH
- Alternate Air or Carburetor Heat Lever: ON (if available)
- Magneto Switches: BOTH
- Flaps: UP
- Gear: UP
- Seat Belts: Fastened
Here's a brief explanation of each item above:
- We already discussed why we fly at the maximum
range glide speed of 115 knots (Figure 3-3).

Figure 3-3 - We check to ensure that both fuel selectors are
set to their ON positions (Figure 3-4).
You might not believe it, but sometimes when pilots switch fuel tanks they accidentally set their levers to the OFF position. It's also possible to accidentally bump the levers with a hand or foot, knocking them to the OFF position or to the position of a fuel tank that's empty (like the pilot's head at the time the switch was moved to OFF position).
Figure 3-4
- The Baron has electric fuel pumps and they should
be turned on to help establish any interrupted flow
of fuel (Figure 3-5).

Figure 3-5 - The mixtures are checked to ensure that they're
in the full forward position, meaning that these
levers won't restrict fuel flow to the engine (Figure
3-6).

Figure 3-6 - This Baron doesn't have alternate air levers, which act as an ancillary source of air in case airflow through the air filter becomes blocked. If it did, we would want to move them to the ON position. This is good to remember for the other planes you fly in Flight Simulator.
- Checking that the magneto switches are set to
BOTH is important because they might have been
bumped accidentally and knocked to the OFF
position (Figure 3-7).

Figure 3-7 - Remember that flaps create drag, so get those up as soon as possible.
- Gear creates drag, too. If you have altitude, raise the gear. However, if you are at a low altitude, you might need to land, so keep them down. But you won't glide as far.
- 9. It could get rough, so stay buckled up.
(Note: Since this a multiengine airplane, we would normally feather both propellers in an engine failure condition. Feathering means pulling the prop levers as far aft as possible to limit the drag produced by windmilling propellers. We don't discuss propeller feathering in this lesson. You can, however, assume that I'll feather both propellers in our airborne nest for you. In real life, however, you'd have to feather your own nest). To learn about feathering propellers, see Flying Twin-Engine Aircraft in the Learning Center.
The object of the engine failure checklist is to get the engine running again. You don't want to make a forced landing, unless you're forced to, right? If you did manage to get that engine restarted, the only problem you now face is explaining to your passengers why it suddenly got quiet in the cockpit (and why you suddenly started sweating because passengers don't like to see these two things occurring together). We'll assume that you were unable to restart the engine for the purpose of this lesson. (Remember, even though I speak of an engine failure in the singular form, I'm referring to both engines for the Baron.)
Being Nosey About the Nose
As I've already mentioned, completing this checklist assumes that you're at a reasonable enough altitude to make such a thing practical. Given that it takes just a few seconds to run through this checklist, you shouldn't lose much altitude during its completion. You should, of course, maintain 115 knots while doing it. The big question is: should you leave the nose pointing in its current direction, or point it somewhere else as you complete the checklist?
Professional thinking holds that safety-conscious pilots should always have a safe landing spot in mind whenever and wherever they fly. In other words, a good pilot is always scouting for a safe landing spot in the event of an engine failure the moment he or she lifts off. Of course, an airport would always be a preferred landing spot because it has runways, mechanics, and vending machines. An open field is the next best choice if there's no airport nearby (but if has a vending machine in the middle of it, please avoid it). Upon engine failure, the pilot would instinctively and reflexively turn toward the airport or field and run through the engine failure checklist. Once the checklist is completed, the pilot's full attention can now be devoted to landing the airplane. If an engine quits at a low altitude, then the pilot must immediately dedicate all of his or her attention to configuring the airplane for a safe emergency landing before completing the engine failure checklist (if there is even time to complete it, of course). Engine failures after takeoff are a good example of this scenario. There's often little or no time to play with a checklist when the airplane is just a few hundred feet off the ground.
In this lesson, you'll experience an engine failure at 8,000 feet mean sea level (MSL), which puts you approximately 7,400 feet above ground level (AGL). You'll have plenty of time to complete the engine failure checklist in this instance. Once done, you should use your GPS (Figure 3-8) to find the nearest available airport.
 Figure 3-8 |
As you've learned by reading the GPS material in the Learning Center, all you have to do is point the tiny airplane in the tiny moving map window toward the tiny airport to begin moving towards it. This will keep you from landing off field, possibly rolling the airplane up into a tiny little ball.
Because of that "psychicness" I mentioned in Commercial Lesson 2, I predict that Paine Field will be the nearest airport to you. It's great being psychic. It's also great being the one who writes these lessons, which helps ensure that I'm psychic nearly 100 percent of the time. So point your nose toward Paine Field and prepare to experience Paine. Let's also prepare for the next step in this emergency landing.
Reduce the Pain of Emergency Landings
Paine Field has three runways for your landing pleasure (Figure 3-9).
 Figure 3-9 |
It also has an air traffic control tower. Once you're pointed in the direction of the airport, you should consider making a "Mayday" call. This is where you transmit the words, "Mayday, Mayday, Mayday" on the appropriate radio frequency. If you had an engine failure in the month of June you wouldn't, however, transmit, "Juneday, Juneday, Juneday." No one would understand what you mean, nor would anyone care what you mean. "Mayday" is the international term for, "I've got an emergency and need assistance." Obviously, it would be best to transmit on Paine Tower's frequency since you're having your emergency there. If you didn't know the tower frequency, then you should transmit on the international aviation emergency frequency of 121.5 MHz. You'll certainly get someone's attention here. The object is to inform someone of your problem and obtain any assistance possible.
If you did transmit on Paine tower's frequency, the controller would most likely ask you about the nature of your emergency. You should tell him that both engines are inoperative and that you intend to make making an emergency landing at Paine. The controller would most likely clear the entire airport of traffic and make it "Airport Day for Bob" (if Bob is your name), meaning that you have the place all to yourself. The controller might then ask what kind of assistance you'd like. Sometimes they'll offer to roll the crash trucks in case you needed that kind of assistance. I wouldn't, however, ask them if they could roll the catering trucks instead. You want the controller to think you're hungry for safety, not sandwiches.
Landing into the wind is an important objective during any emergency. This provides you with the slowest touchdown speed and the shortest possible landing distance. That's why when communicating with Paine tower, the controller would most likely inform you of the runway that's most nearly aligned into the wind. Pick that one. For this particular lesson, there will be no wind at Paine today. (Not only am I psychic, I also control the wind. I love this job.) This means you have the option of landing on any runway and in any direction you choose. Given these choices, I would certainly fancy landing on the long runway, which is 34L/16R. You should fancy that, too. Just don't try and fly fancy.
The Emergency Landing
Now that you've elected to make your emergency landing at Paine Field, let's chat about the technique for doing it. Perhaps the single most important item in the emergency landing process is to remain within gliding distance of the airport. Obviously you'll have to circle down from above the airport, eventually delivering yourself onto the downwind leg of the runway chosen for landing. It's best to avoid making a straight-in approach with an engine failure when you can fly a modified rectangular traffic pattern (Figure 3-10)
.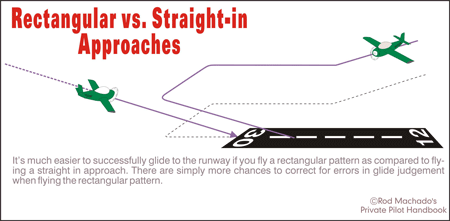 Figure 3-10 |
Why? Flying a rectangular pattern provides you with more options for correcting any errors in judgment you've made about the airplane's gliding distance. It's simply way too difficult to estimate how well you're gliding when flying on a long final as compared to flying parallel to the runway then turning base and final. You can change the geometry of a rectangular pattern to reach the runway as shown in Figure 3-11. It's much more difficult to change your glide range during a long final approach.
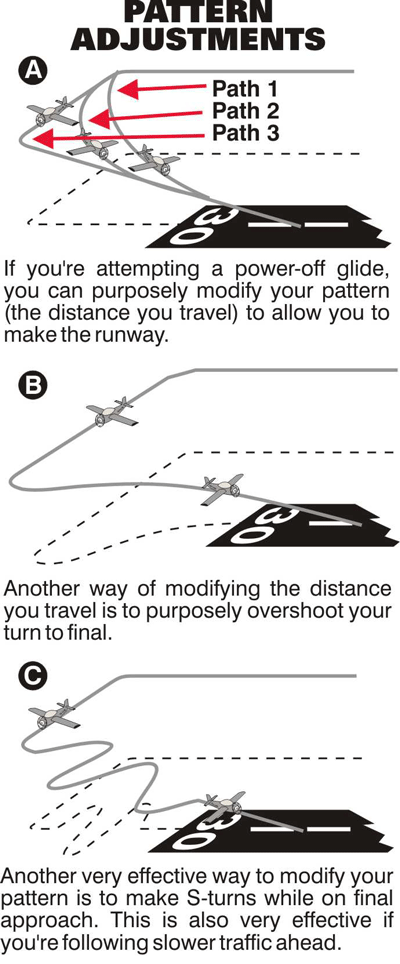 Figure 3-11 |
Since you're gliding directly toward the center of the airport, begin a left-hand turn using between 20 and 30 degrees of bank when you're over the center of the runway complex. Circling to the left above the airport allows you to see it more easily during the descent since pilots often sit on the left side of the airplane. This is known as a descending spiral. Your objective here is to modify the bank angle slightly during the descent so as to remain over the geographic center of the runway complex. This keeps you in the best position from which to choose the most desirable landing runway as you get closer to field elevation.
From this point on down, you're constantly watching, planning, plotting and scheming.
When you're approximately within 2,000 feet of airport elevation, you should decide on the best runway to use for the emergency landing. Since Paine is 606 feet above sea level, you'll want to make this decision when you're approximately 2,600 feet MSL. At this time, ask yourself which way you need to maneuver so as to roll out on the downwind leg of a suitable landing runway. If one runway is favored because of the wind conditions, you'll certainly want to maneuver so as to rollout flying downwind and parallel to that runway. Your objective should be to fly offset from the runway centerline by a distance of approximately one quarter to one half of a mile (Figure 3-12). This should keep you within gliding distance of the desired runway.
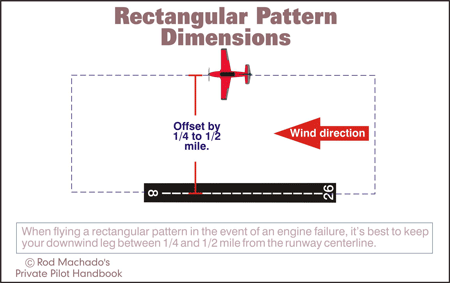 Figure 3-12 |
If you planned it properly, you should end up midfield, flying downwind at an altitude between 2,000 and 1,500 feet AGL. Your objective is to end up abeam the runway threshold at approximately 1,000 feet AGL (Figure 3-13).
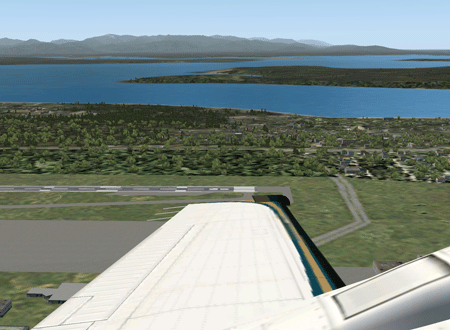 Figure 3-13 |
As you've learned in previous lessons, if you're too low or high from this position, you can modify the shape of the pattern to help you glide to the runway. During this portion of the lesson, make sure you use the keyboard or hat switch on your joystick to keep an eye on the runway's position. Plan on turning onto base leg when the runway is 45 degrees to the left of the wing if not just a little sooner. As a general rule (even if you're not a general), it's always better to be a little high than too low when landing without the use of the engine. You can always lose altitude but it's very difficult to gain altitude when the engine's on vacation. From the abeam position downwind, how you fly the base and final legs determine whether or not you'll be able to glide to the runway. Your ability to estimate glide distance and modify your flight path is a matter of practice and experience.
On base leg, however, you're in a good best position to complete the emergency landing checklist that follows:
Basic/Emergency Landing Checklist
- Airspeed: 115 knots until ready to roundout and flare
- Mixtures: Idle cutoff
- Fuel Shutoff Valves: OFF
- Ignition Switches: OFF
- Flaps: As Required
- Gear: Down
- Master Switch: OFF
- Doors: Unlatch Prior to Touchdown
Here's a brief explanation of each item above:
- You want to maintain 115 knots until you're in a position where you don't need the best glide ability of the airplane. Most likely this will be when you begin the roundout for the landing flare.
- Before landing, the mixtures should be set to idle cutoff to prevent leaning fuel or a sudden engine restart at a time when you don't expect nor want it.
- Fuel shutoff valves should be set to OFF to prevent fuel leaks after touchdown or impact.
- Ignition switches are set to OFF to similarly prevent an unanticipated engine restart, among other reasons.
- Flaps as required. Remember, if you're landing in a field, you'll want to touchdown with full flaps (if possible) to reduce your touchdown speed.
- The landing gear should be down before landing unless you're landing on water or similar surfaces, in which case you may want to make a gear-up landing. No, we don't do this to prevent conking a flounder on the head. We do so to prevent the airplane from nosing forward into the water upon landing, possibly resulting in a flip over, much like the dolphin does (which you don't want to do since no free snack of mackerel is involved).
- The master switch the next to last item that's turned off. This minimizes an ignition source that could start a post-crash fire. It's last because, on airplanes like the Baron, it takes electricity to lower the flaps and gear.
- Finally, you want to crack the airplane door open. This prevents the door from being jammed if the touchdown is rough, meaning that you'll have an easier time exiting the airplane if desired.
Because the purpose of this lesson is to train you in glide procedures, I'll run through the engine failure checklist for you during flight. I want you to concentrate on maintaining the proper glide speed and remaining within gliding distance of the runway.
Well, that's the basic course in handling an engine failure in flight. I want you to repeat this lessons as many times as you need to develop your proficiency. Admittedly, it's much more challenging to handle a double engine failure in a Baron than it is, say, a Cessna Skyhawk SP Model 172. The Baron flies a little faster and comes down a little quicker. Nevertheless, if you can successfully land this airplane at Paine Field, you can probably land most any single engine airplane under the same conditions, too. The principles presented here are generic, but you'll find the applicable to most other simulator-type airplanes.
Click the Fly This Lesson link to practice what you've just learned.