During most of the past classes, you've seen what flying is like when looking at the earth's horizon through the windscreen. Suppose I took that away from you. No, not the windscreen. I mean your outside visual references. That's what would happen if you flew into a cloud. In case you don't know this, you can't see very far when you're inside a cloud, which means it's unlikely that you'd be able to see the earth's horizon. Without visual references, you'd need to rely on the airplane's instruments to maneuver. That's what the next three classes are about.
I plan to show you a three-step process for scanning your flight instruments. It's the same process I use when preparing students for their instrument rating (a license allowing them to fly inside clouds). If you take the time to master each step, you'll acquire skills similar to those possessed by airline pilots. The only difference is that you won't have 150 to 400 people sitting behind you watching every move you make. First, let's make sure you understand what instrument scan actually means.
When pilots talk about scan, they don't mean CAT scan (which my cat doesn't like) or brain scan (which you'll need if you dent a lot of airplanes). They're talking about scanning the six flight instruments on the airplane's panel, as shown in Figure 1. Scanning is not just moving your head quickly enough to cause your eyes to rattle in their sockets like the last breath mint in the plastic box. It's a strategic process of knowing what instrument to look at, when to look at it, and what to do after you look at it. That's why I've broken the scan process down into three easy steps. All three steps are shown below, but I want you to master each step one at a time before combining them into a smooth, continuous process.
 Figure 1 |
Here are the steps in the order they should be performed:
- STEP 1: Select attitude, power, and trim.
- STEP 2: Radial-scan the primary instruments.
- STEP 3: Trim using the VSI, and monitor-scan the Big-6 instruments.
These three steps are executed in sequence every time you make a major attitude change. For instance, if you're in straight-and-level flight and want to enter a climb, that's a major attitude change. Transitioning from a straight climb to a climbing turn is also a major attitude change. Essentially, any combination of the basic flight maneuvers involves a major attitude change. All three steps in sequence should take approximately 15 to 20 seconds to complete. In this class, you'll work on Step 1, followed by Step 2 and Step 3 in the next two classes. Master each step, and you'll master flight by reference to instruments.
Step 1 of the instrument scan involves one of the most important instruments on the airplane-the attitude indicator (called AI from now on). When you select the attitude in Step 1, you are looking at the AI and nothing else. You can afford to do this because the AI provides both pitch and bank information. Other instruments in the group give you a form of either pitch or bank information, but not both. This is why the AI is so valuable. Before we talk about Step 1, however, you need to understand something known as a wing leveling-and-pitch reflex.
The wing leveling-and-pitch reflex refers to the skills necessary to help maintain any desired attitude. Maintaining a specific attitude isn't an easy thing to do. Pilots are often distracted from their scan, and turbulence frequently perturbs the airplane, both of which may induce a bank, resulting in an unwanted turn. Skilled pilots immediately correct this unwanted pitch and bank by reflex. Without thinking about it, they reflexively move the joystick and return the airplane to the desired attitude. Unless you've practiced doing this, you'll have to think about it before reacting. While a slow reflex may work if you're flying a blimp, it won't work in an airplane.
You'll get a chance to develop your wing leveling-and-pitch reflex in the Interactive Lessons. Don't rush through this exercise. I can't express enough how important it is. I spend several hours with students in airplanes making sure they know which way to move the joystick to level the wings or maintain the desired pitch. If you feel you've mastered these reflexes (and still have some feeling left in your arms), then move on to Step 1 of the three-step scan.
Step 1 requires you to select the attitude, power, and trim conditions for the desired attitude. For instance, if you're in straight-and-level flight (Figure 2) and want to climb (this is a major attitude change), you'll need to select a climb attitude, apply climb power, and then trim for this condition. Do this by focusing entirely on the AI.
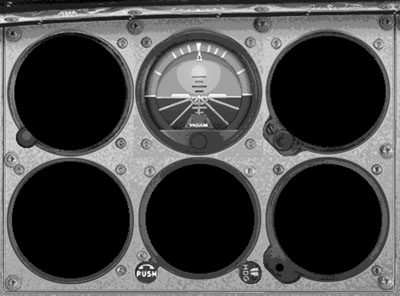 Figure 2 |
From your previous experience, select the attitude that gives you the flight conditions desired. You still remember these attitudes from the previous lessons, don't you? If not, now may be a good time to review them. Figure 3 shows the approximate pitch required to climb at 80 knots with full power (13 degrees nose-up).
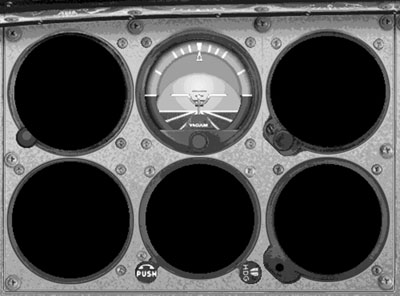 Figure 3 |
Here's how we'd complete the sequence according to Step 1 when entering a climb from straight-and-level flight:
- Pitch the airplane up to about 13 degrees. You can't be sure that this will give you exactly 80 knots, but that's okay for now. You just want to put the airplane in the approximate attitude. We'll worry about the details later.
- After pitching up, apply climb power (2550 RPM). (Don't apply climb power until the airplane begins pitching up. The pitch-up attitude puts an aerodynamic load on the propeller and prevents RPM overspeed as you apply power.)
- Apply trim to maintain climb attitude. (You're interested in a rough approximation of trim here. The final trim is applied in Step 3 of the three-step scan.)
Excellent! Muy bien. Now let's examine how we'd apply Step 1 of the scan as we make a major attitude change and return to straight-and-level flight from a climb.
If you're in a climb, here's how you would return to straight-and-level flight using Step 1 of our instrument scan.
- Pitch the airplane forward to the attitude for straight-and-level flight (Figure 2). You can't be sure you're in precise straight-and-level flight, but that's still okay for now.
- Wait approximately 10 seconds, then reduce power to a cruise setting of 2300 RPM. (Why wait 10 seconds? Because you want the airplane to accelerate quickly to cruise speed before making a power reduction. In the next class Step 2, you'll wait until reaching a cruise airspeed of 100 or more knots before reducing power. Since you can't see the airspeed, use 10 seconds for now.)
- Once the power is reduced, apply trim to maintain the attitude for straight-and-level flight.
Now let's examine how we'd handle entering a descent from straight-and-level flight using Step 1. The important thing to know here is the proper attitude when descending. Descents are typically done at airspeeds higher than that used for climbing. So let's use a one-half-degree pitch-down attitude, as shown in Figure 4. This will give you a descent at approximately 100 knots. Remember the sequence: attitude, power, and trim. Here's how it should go.
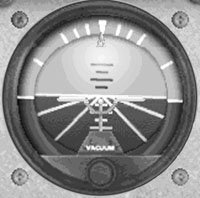 Figure 4 |
- Select the proper attitude for the descent (Figure 4).
- Immediately reduce power to flight idle. (It's considered good form to make the attitude and power change at the same time. Reducing power results in the nose automatically pitching forward on its own, which makes it easier to establish the nose-down attitude. Lowering the nose with power on results in an increase in airspeed, perhaps beyond that which you want.)
- Trim to maintain the desired nose-down pitch attitude.
Next, let's examine how we'd enter straight-and-level flight from a descent. Remember the sequence: attitude, power, and trim.
- Select the attitude for straight-and-level flight (Figure 2).
- Add power to cruise RPM (2300). If you wait too long to add power, the airspeed will decrease. That's why it's usually good form to start increasing power as soon as the airplane approaches a level flight attitude.
- Trim to maintain the desired attitude.
This was an important ground school class. It's often the little things that give instrument pilots a difficult time, such as knowing how and when to change power. Granted, this may not be exciting, but it is worthwhile to understand. Now let's examine how we'd enter a turn from straight-and-level flight (another major attitude change) using Step 1 of our instrument scan.
In previous classes lessons, you learned that turns were made at 20 to 30 degrees of bank. This is appropriate for instrument flying, too. What you don't want to do is make turns in excess of 30 degrees of bank. Why? Turning too steeply increases a pilot's workload while flying under instrument conditions. Instrument flying is hard work, and the last thing a pilot needs is to struggle with the aerodynamic forces associated with steep turns. Let's agree to use 20 degrees of bank for all turns while flying instruments. Later, you'll learn advanced turning concepts, such as standard rate turns.
Since I know you're already skilled at turns, let's examine how we'd use Step 1 of our instrument scan to combine the turn and the climb entry during this major attitude change. This is just like a fancy dance step in which moves are combined, but no one's toes are jeopardized. The secret is to enter a 20-degree bank turn while simultaneously pitching to climb attitude. Here's how it's done.
- Roll into a 20-degree bank turn to the right, and simultaneously pitch up to climb attitude (Figure 5).
- After pitching up, apply climb power (2400 RPM).
- Trim to maintain climb attitude.
- Now let's examine how we'd enter a left-descending turn using Step 1.
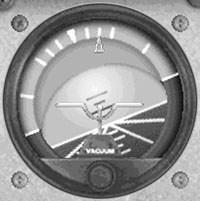 Figure 5 |
- Select the attitude for a left-descending turn (Figure 6).
- Simultaneously reduce power to flight idle.
- Trim to maintain this attitude.
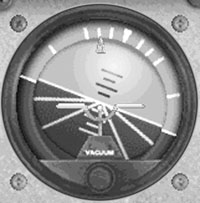 Figure 6 |
Remember, you've been practicing learning Step 1 of a three-step instrument scan. Once the attitude, power, and trim conditions are established, you're ready to move on to Step 2. Step 2 allows you to fine-tune the attitude selection you made in Step 1.