Step 1, Step 2, Step 3: Doesn't this sound like a Fred Astaire introductory dance lesson? Well, instrument scan is best taught and understood by easily managed steps. In this sense, your dance partner is the instrument panel, and your eyes dance from instrument to instrument in an organized way. You've learned Step 1 of the three-step scan-now on to Step 2.
Step 1 allowed you to place the airplane in any attitude solely by reference to the attitude indicator (AI). Using the AI as your only means of attitude control, however, is like using a thermonuclear weapon to kill fleas in your apartment. It works, but lacks the precision your neighbors have come to expect in a bug bomb. As an instrument flyer, you need precise control of headings, altitudes, and airspeeds. Once you've selected a new attitude in Step 1, you'll proceed to Step 2, where you'll radial-scan the primary instruments and fine-tune the attitude selected in Step 1.
The purpose of Step 2 is to look at one or more flight instruments and then make any necessary changes in pitch, bank, or power to obtain the flight attitude desired. This, in turn, allows you to obtain the precise heading, airspeed, and altitude desired. The term radial-scan signifies that your scan starts at the AI, goes to a primary instrument on the panel, and then returns to the AI. The scan pattern is out and then back along the same path. Think of the path your eyes make as they start from the center of a bicycle's wheel and follow a spoke radiating outward and inward, as shown in Figure 1.
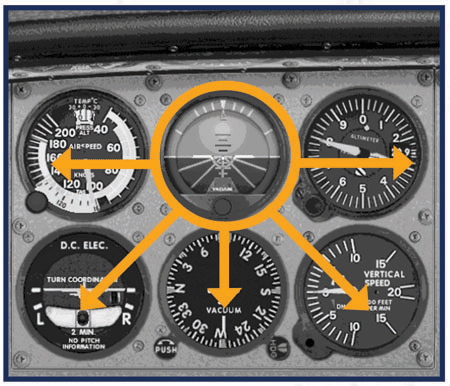 Figure 1 |
Anything that's primary is important. And primary instruments give you the most important information for precise control of pitch, bank, and power. Each attitude you select uses three primary instruments: one for pitch, one for bank, and one for power. But how do you know which instruments these are? After all, you have several to choose from. To answer that question, let's go for a hamburger.
When you order food from the Hamburger Palace, the server pushes a button with a picture on it of the item you selected. Order a soda, and he pushes a button with a soda on it. This neat visual method frees up the server's mind to think about more important things, such as philosophy, ethics, and an alternate proof to Fermat's last theorem. Of course, if you say, "Beautiful weather," the server might say, "I'm sorry, I don't have that button." Let's use a similar labeling system to identify the primary instruments on your panel.
I'd like you to place the labels shown in Figure 2 directly onto your computer screen under each instrument shown (we won't label the VSI for now). Use a small quarter-inch strip off the sticky end of one of those yellow sticky notes. Don't use labels with permanent adhesives (there's always a job open for you at that burger joint if you do!).
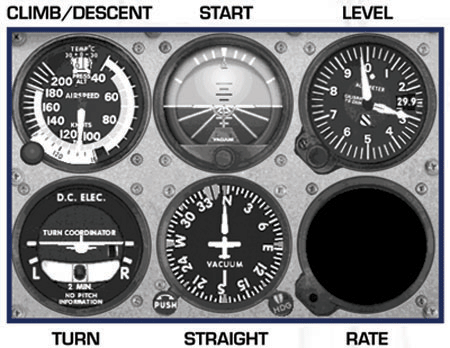 Figure 2 |
Figure 2 identifies the primary instruments for any given flight condition. Assume that you've just selected the attitude for straight-and-level flight. Which primary instruments should you radial-scan? Look at the panel and find those instruments labeled straight (heading indicator) and level (altimeter). The heading indicator helps you fly straight; the altimeter helps you fly level; and the tachometer shows the power setting selected. In other words, you can fine-tune the attitude for straight-and-level flight by scanning only these three instruments. Easy, huh?
Suppose you've placed the airplane in the attitude for a straight climb (or descent). Which primary instruments should you radial-scan? Find the instruments labeled straight (heading indicator) and climb (airspeed indicator). The heading indicator helps you fly straight; the airspeed indicator helps you determine the proper pitch for a climb (or a descent); and the tachometer shows the power setting selected.
Finally, let's suppose you placed the airplane in the attitude for a level turn. Which primary instruments should you radial-scan? Find the instruments labeled level (altimeter) and turn (turn coordinator). The altimeter helps you fly level; the turn coordinator helps determine the amount of bank required for the desired turn (you'll see how shortly); and the tachometer shows the power setting selected.
Now you know how to determine which instruments to scan for any condition of flight. Next, you want to radial-scan the primary instruments and observe their indication or detect needle movement. Then, return to the AI and make an attitude adjustment (if necessary) to stabilize the primary instrument. Let's examine how we'd do this with straight-and-level flight first. We'll assume that we've just entered straight-and-level flight from another attitude.
All but the primary instruments for straight-and-level flight are blackened out in Figure 3, the way they would be in real instrument training. We'll assume that you've just completed Step 1 and have placed the airplane in the attitude for straight-and-level flight. Begin Step 2 by radial-scanning the primary instruments and adjusting the attitude on the AI (if necessary) for precise straight-and-level flight. Before we continue with this discussion, let's talk a little more about radial-scanning.
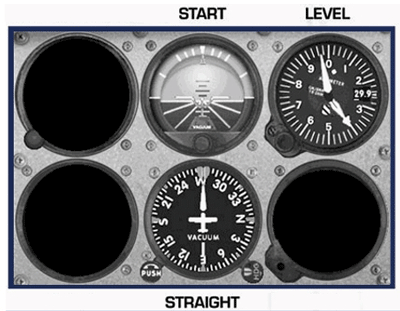 Figure 3 |
The AI has the word "start" under it since this is where all radial scanning begins. Like the hub of that bicycle wheel, your scan will start here and radiate outward to a primary instrument. You'll spend about 1 to 2 seconds on the primary instrument while checking for any deviations or needle movement. Then, you'll return to the AI and make corrections (if necessary) to stabilize the primary instrument.
Of course, you can radial-scan more than one instrument. To do so, you'd start at the AI, go to a primary instrument, and then return to the AI. From there, you'd go out to another primary instrument and return to the AI, repeating the process over again with any instrument desired, always returning to the AI.
For instance, in straight-and-level flight, you'll radial-scan the heading indicator (straight), the altimeter (level), and the tachometer (power). Starting at the AI, move down to the heading indicator. Look for any deviation from the desired heading. Return to the AI, and make a small change in bank (if necessary) that stops the heading change or returns the airplane to the appropriate heading. From there, move to the altimeter and look for any deviation from the desired altitude. Return to the AI, making a small pitch change (if necessary) that stops the needle or returns it to the appropriate position. The tachometer is radial-scanned last. Look at the tachometer and make a final adjustment in the setting (if necessary), then immediately return to the AI. Usually, there is no need to radial-scan the tachometer more than once during a major attitude change. Now, start over with the heading indicator, repeating the radial-scan until both instruments (heading indicator and altimeter) indicate straight-and-level flight. Here's how the sequence should look.
- Start at the AI, and radial-scan the heading indicator.
- Return to the AI, and adjust the bank (if necessary) to maintain 270 degrees.
- Radial-scan the altimeter.
- Return to the AI, and adjust the pitch (if necessary) to maintain 4,000 feet.
- Radial-scan the tachometer, and adjust the throttle position (if necessary) for a cruise RPM of 2300 (there's usually no need to radial-scan the tachometer again).
- Keep radial-scanning the heading indicator and altimeter, making small attitude corrections, until the airplane is established in straight-and-level flight.
The secret to radial-scanning is to quickly scan each of the primary instruments at least once before spending additional time radial-scanning any one instrument in particular. This allows you to determine how close the airplane is to the desired attitude and gives you an idea about how much work will be involved in stabilizing the airplane. Let's examine how we'd radial-scan the primary instruments in a straight climb.
Once again, all but the primary instruments for a straight climb are blackened out (Figure 4). Let's assume that you've just entered a climb straight ahead and are starting Step 2 of the three-step scan. You'll adjust the attitude on the AI for a precise climb at 80 knots on a heading of 270 degrees.
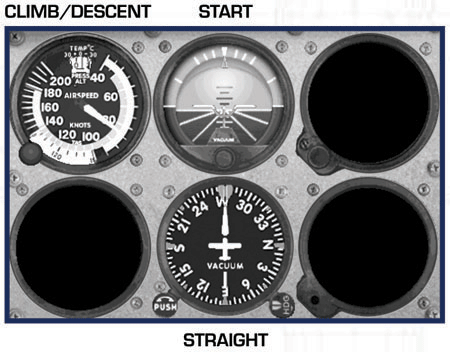 Figure 4 |
Here's the sequence you'd use to radial-scan the primary instruments.
- Start at the AI, and radial-scan the heading indicator.
- Return to the AI, and adjust the bank (if necessary) to maintain a heading of 270 degrees.
- Radial-scan the airspeed indicator.
- Return to the AI, and adjust the pitch (if necessary) to maintain 80 knots.
- Radial-scan the tachometer (if necessary), and adjust the RPM to a climb value of 2400 (there's no need to radial-scan the tachometer again).
- Keep radial-scanning the heading indicator and airspeed indicator, making small attitude corrections, until the airplane is established in a straight climb at 80 knots on a heading of 270 degrees.
There you have it. Knowing ahead of time what instruments to look at for precise control of your attitude takes the mystery out of flying instruments.
Now let's try Step 2 of our scan on a level flight turn.
All but the primary instruments for a level turn are blackened out (Figure 5).
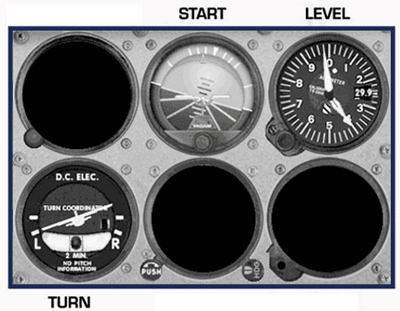 Figure 5 |
Let's assume that you've just entered a level turn to the left at 4,000 feet and are starting Step 2. You should begin radial-scanning the primary instruments and adjust the attitude on the AI for a precise altitude of 4,000 feet and a standard rate turn.
Huh? What's a standard rate turn?
Standard rate turns allow the airplane to change headings at a rate of 3 degrees per second. In the previous classlessons, I suggested you make turns at 20 degrees of bank. That's perfectly fine, but for greater precision, I want you to make them at a standard rate. You'll do this by adjusting the bank until the wing of the turn coordinator's airplane is on the second white index mark, as shown in Figure 5.
Now the airplane will change headings at precisely 3 degrees per second. A standard rate turn gives you a sense of how long it takes to complete a turn. After all, at 3 degrees per second, it takes two minutes to make a 360-degree turn and one minute to make a 180-degree turn. Here's the sequence you'd use to radial-scan the primary instruments.
- Start at the AI, and radial-scan the altimeter.
- Return to the AI, and adjust the pitch (if necessary) to maintain 4,000 feet.
- Radial-scan the turn coordinator.
- Return to the AI, and adjust the bank (if necessary) to maintain a standard rate turn.
- Radial-scan the tachometer (if necessary), and adjust the RPM to a cruise value of 2300 (there's no need to radial-scan the tachometer again).
- Keep radial-scanning the altimeter and turn coordinator, making small attitude corrections, until the airplane is established in level flight at 4,000 feet in a standard rate left turn.
If you've gotten this far, you'll soon be qualified to say, "Who's the greatest pilot… and why am I?" In our final example, we'll examine how to apply Step 2 to accomplish a right-descending turn.
All but the primary instruments for a descending turn are blackened out (Figure 6). Let's assume that you've just entered a power-off, right-descending turn and are starting Step 2 of the three-step scan. Begin radial-scanning the primary instruments. Adjust the attitude on the AI for a precise descent at 100 knots in a standard rate turn.
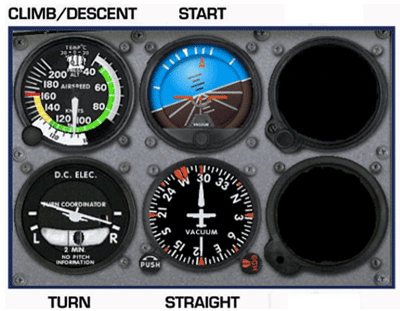 Figure 6 |
Here's the sequence you'd use to radial-scan the primary instruments.
- Start at the AI, and radial-scan the airspeed indicator.
- Return to the AI, and adjust the pitch (if necessary) to maintain 100 knots.
- Radial-scan the turn coordinator.
- Return to the AI, and adjust the bank (if necessary) to maintain a standard rate turn. (There is no reason to radial-scan the tachometer since you've reduced the throttle to flight idle.)
- Keep radial-scanning the airspeed indicator and the turn coordinator, making small attitude corrections, until the airplane is established in a standard rate descending turn to the right at 100 knots.
In the next article, we'll complete the final step of the three-step scan. This is where we'll wrap up all the hard work of establishing the airplane in a new attitude. We'll trim, sit back, and enjoy the new attitude we've selected-at least until we decide to make another major attitude change.