The Flight Simulator Tower feature (Deluxe version only) lets you host or join a multiplayer session as an air traffic controller. The Tower panels are based on the tools that real controllers use every day. This article explains how to use the Tower panels to monitor and direct aircraft flying in a multiplayer session.
You don't have to conduct your Tower sessions by the rules (that's the beauty of a simulator). But if you want to know more about how air traffic control is conducted in the real world, start by reading ATC Defined in the Learning Center. You'll find help to get you started and information about Air Traffic Control resources outside of Flight Simulator.
Introduction
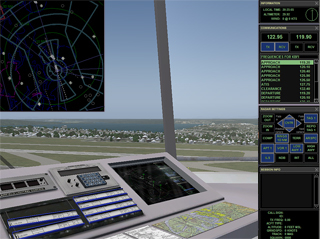
Real-world air traffic controllers work in one of three specialties: Tower, Approach, or Enroute. While the radar features of the multiplayer Tower can be used to simulate Approach and Enroute controller roles, this article will focus on the Tower controller role. Tower controllers work in the room at the top of a control tower (the cab), and are responsible for directing aircraft on the ground and in the air within 5 miles of the airport, up to an altitude of 3,000 above the ground. They have many of the tools of Approach and Enroute controllers, but instead of sitting at a radar scope they get to look out the window. If you like looking at airplanes—real or simulated—this is the job for you!
Getting to Work
Your session will begin in the control tower at your chosen airport. There are two tower cab variations to choose from on the multiplayer Select Aircraft screen. The default variation has a 3-D virtual tower cab, and the other has no cab, which provides a more unobstructed view of the outside world. (To see and select the no-cab variation, you must have the "Show all variations" check box selected.)
|
To set up a control tower
|
You can move to any one of four controller stations within the tower cab. You'll probably want to move to the station that gives you the best view of the active runway (the runway that is most closely aligned with the wind). At a large airport with multiple runways, you might need to move around quite a bit to see everything.
|
To change stations
-or- Note: When you change stations or views all open Controller panels will close. |
Looking Around
Just like in a Flight Simulator aircraft, in the tower you can cycle view categories by pressing S, and cycle views within a view category by pressing A. Generally, when acting as a Tower controller you'll want to use Virtual Cockpit view, so you can see the 3-D cab interior and easilly pan your view to look around. The equipment you'll use to do your job is found on the pop-up panels explained below.
You can look around the tower cab using your mouse. Press and hold the SPACEBAR and move the mouse. You can also look around by moving the hat switch on your joystick, by pressing keys on the numeric keypad, or by using the thumbstick on an Xbox 360 controller for Windows. You can zoom in and out for a better view.
|
To zoom in and out
|
Having trouble seeing the runway? In a real tower you'd just lean forward a bit or stand up. In Flight Simulator you can move the eyepoint, the point from which your virtual eyes look out.
To move the eyepoint:
| Action *3-D virtual cockpit only |
Key command |
| Move eyepoint back* | CTRL+ENTER |
| Move eyepoint up | SHIFT+ENTER |
| Move eyepoint down | SHIFT+BACKSPACE |
| Move eyepoint forward* | CTRL+BACKSPACE |
| Move eyepoint left* | CTRL+SHIFT+BACKSPACE |
| Move eyepoint right* | CTRL+SHIFT+ENTER |
| Reset eyepoint | CTRL+SPACEBAR |
To learn more about views, see Using Views and Windows.
Controller Panels
Controller panels based on existing real-world technology provide you with all the information you need to get the job done as a multiplayer Tower controller. There are six pop-up panels that you can display one at a time, or all at once (press SHIFT+1 through SHIFT+6):
- Panel Options
- Radar Screen
- Airport Information
- Communications
- Radar Options
- Session Information
Each panel can be dragged and resized. If you use multiple monitors, you can move controller panels between monitors to avoid blocking your view out the tower windows. Additionally, you can adjust the transparency of all the panels so that you can see through them.
Each panel is explained below.
Panel Options
The Panel Options panel gives you easy access to all of the other pop-up panels. Just click a button to display that panel. Additionally, you can use the Fade Out and Fade In buttons to change the transparency of all the panels.

|
To display the Panel Options panel
|
Radar Screen
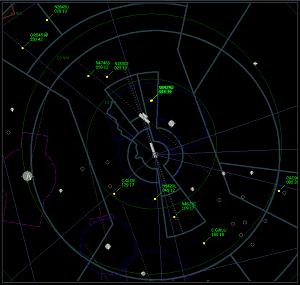
While Approach and Enroute control facilities use radar as the primary means to separate aircraft, many small control towers don't have radar. In fact, some of the most fun you can have as a Tower controller is trying to keep track of all the aircraft you're controlling using only the view out the window and what you hear on the radio! That said, radar provides additional situational awareness. Instead of having to keep the big picture in your head, you can just look at the radar and see exactly where each aircraft is.
|
To display the Radar Screen
-or- |
The Radar Screen displays a map, a compass, range rings, airports, navigational aids, fixes, airways, and aircraft symbols with associated datatags. Each screen element can be displayed or hidden using buttons on the Radar Options panel.
|
Which direction am I looking? The Radar Screen is presented with magnetic north at the top. When you look out the window of the tower cab, you must be aware of what direction you are looking (relative to the runways) to see the aircraft that appear on the radar. |
Targets and History Trails
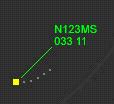
Because radar does nothing more than show the location of an aircraft, a "history trail" provides a visual indication of the aircraft's position over time, as well as its speed and relative direction of flight.
Datatags
Datatags provide you with important information about each aircraft shown on the radar screen. The datatag is connected to the aircraft symbol with a "leader line." There are two types of datatags: Realistic and Detailed. The tags can be toggled between Off, Realistic, and Detailed by pressing the TAG button on the Radar Options panel.
The Realistic datatags are based on the radar displays in U.S. Tower and Approach Control facilities.
 |
Aircraft callsign |
| [Three-digit altitude in hundreds of feet] [Groundspeed in knots divided by 10] | |
| Note: The second line cycles every few seconds between [altitude/groundspeed] and [destination (if a flight plan was created)/aircraft type]. | |
The Detailed datatags provide information in a more easily-understood format.
 |
Aircraft callsign |
| ACFT: (Aircraft type) | |
| DEST: (Destination ID if a flight plan was created) | |
| ALT: (Altitude in feet above mean sea level) | |
| SPD: (Groundspeed in knots) |
By default, datatags are positioned up and to the right of the aircraft symbol with which they're associated. To avoid overlapping datatags, reposition them.
|
To reposition a datatag
|
Airport Information
The Airport Information panel provides you with three key pieces of information:
- The current local time of day (24-hour clock)
- The current local altimeter setting
- The wind direction, wind speed, and a visual wind direction indicator

|
To display the Airport Information panel
-or- |
Communications
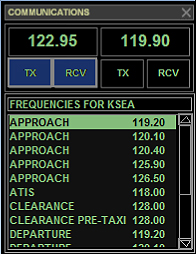
The Communications panel features two communications radios, each with a frequency selection window, a Transmit (TX) button, and a Receive (RCV) button. You can receive on either or both radios. You can transmit on only one radio at a time.
Below the radios is a list of frequencies for your airport. You can manually tune a frequency using the mouse (see Using the Radios), or use the scrollbar and click one of the frequencies in the list to quickly tune the radio you're set to transmit on.
|
To display the Communications panel
-or- |
If you have a headset, you can communicate with other players in the session via voice if the host of the session has chosen to enable voice on the Host Option screen. How you communicate depends on the voice communication option that the host selected:
| Option | How to communicate |
| Always activated for all players (default) | All players in the session can hear all each other at all times. To talk, press and hold CAPS LOCK. |
| Only activated using aircraft radios | Players must be tuned to the same radio frequency to hear each other. To transmit, press and hold CAPS LOCK. To broadcast to all players, regardless of whether they're tuned to your radio frequency, press and hold SHIFT+CAPS LOCK. |
If you're in a session with a single Tower controller, the "Always acivated for all players" option makes it easy to communicate. But if you have muiltiple towers, or want a more realistic experience, the "Only activated using aircraft radios" option is a better choice, as it forces players to tune to your frequency to communicate with you. Before starting a session, it's helpful to tell other players what frequency you'll be operating on.
To learn more about using voice and chat, see Talking to Other Players.
Radar Options
The Radar Screen is configured and controlled via the Radar Options panel.

|
To display the Radar Options panel
-or- |
Each Radar Options button has multiple states. Click a button multiple times to cycle through the button states and observe the changes displayed on the Radar Screen.
| Button | Function |
| ZOOM OUT | Zooms map out |
| ZOOM IN | Zooms map in |
| CNTR | Centers map on airport |
| ARROWS | Pan map |
| TAG | Toggles datatags (Off/Realistic/Detailed) |
| REPO TAG | Repositions datatag of aircraft selected on Session Information panel |
| COMP | Toggles compass rose (Off/On) |
| RINGS | Toggles range rings (Off/2/5/10/20 miles) |
| TERR | Toggles terrain (Off/On) |
| ARSPC | Toggles airspace boundaries (Off/On) |
| APT | Toggles airports (Off/Symbols/Symbols and Labels) |
| VOR | Toggles VORs (Off/Symbols/Symbols and Labels) |
| LOW AWY | Toggles low-altitude (victor) airways (Off/Lines/Lines and Labels) |
| HIGH AWY | Toggles high-altitude (jet) airways (Off/Lines/Lines and Labels) |
| ILS | Toggles ILSs (Off/Symbols) |
| NDB | Toggles NDBs (Off/Symbols, Symbols and Labels) |
| FIX | Toggles fixes (Off/Symbols/Symbols and Labels) |
| ALL | Toggles radar filter (All/Ground/Air) |
Session Information
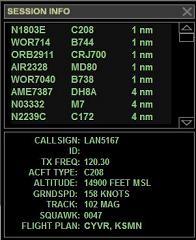
The Session Information panel provides you with a list of all the aircraft in the multiplayer session, as well as details about each player and their aircraft.
|
To display the Session Information panel
-or- |
At the top of the Session Information panel is a list of the players in the session. The list is sorted by distance from the airport, with the closest aircraft at the top of the list.
Use the scrollbar and click an aircraft to see details about that aircraft in the details box below the list. When you click on an aircraft, that aircraft's target and datatag on the Radar Screen will turn red for ten seconds.
The lower half of the Session Information panel displays details about the aircraft and player selected in the list above. Details include:
- Aircraft callsign
- Steam ID
- Transmit frequency tuned to
- Aircraft type
- Altitude
- Groundspeed
- Magnetic track (track over the ground, not heading)
- Squawk (transponder code)
- Flight plan (if one was created)
Putting It All Together
There are two main roles in most control towers: Local Control and Ground Control. The Local controller (more commonly known as the Tower controller) handles aircraft in the air and aircraft on the ground waiting for takeoff. The Ground controller handles aircraft on the ground moving on the taxiways. In some towers, one person handles both jobs. In Flight Simulator, it's up to you.
With the tools described above you have everything you need to be a Ground or Tower controller at any airport in Flight Simulator. With a little creative thinking, you also have most of the tools you need to provide virtual pilots with fairly realistic Approach and Enroute services too. The feature was designed to appeal to a wide cross-section of Flight Simulator fans with a broad range of knowledge and skills. As you explore the world of flying and controlling online you'll quickly learn that there's something for everyone.
If you need some help along the way, just ask. Most of the folks you'll encounter in the Flight Simulator community love this stuff as much as you do, and it's not difficult to find someone to help you get up to speed. For more ideas and resources, see Multiplayer ATC, and be sure to check out FSInsider.com.